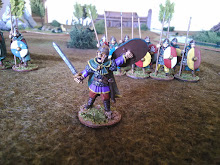
Spent my Saturday wargaming with a friend. Of the 3 games we got in, one was Hail Caesar, the first time I have played it since June 2013. My friend, Matt, had also not played it in a long time and so we both made quite a few mistakes with the rules. Despite those we still had a blast. Our armies were roughly 600 points. I was in command of the Early Imperial Romans vs and army of Successors.
We decided to roll off for set up with the winner deciding if they wanted to deploy first and move second or deploy second but move first. I won the roll and opted to deploy my army second but take the first move.
Matt's Successors consisted of 3 divisions. 2 divisions were about the same and consisted of 2 units of Phalanx Pikemen, 2 units Levey hoplites, 2 units of skirmishers, 1 unit medium infantry each. His last division contained 2 units of Cataphracts, 1 Elephant, and 1 heavy scythe chariot. He deployed his Pikemen in the center flanked by hoplites and then medium infantry. the skirmishers screened either flank. His mounted division was deployed on his left flank, my right.
My Romans (all from Matt's collection) had 2 divisions of mirrored infantry. They contained 1 unit of Praetorians, 3 units of Legionnaires, 1 unit of Axillaries, and 1 unit of skirmishers each. My 3rd division had 2 units of heavy cavalry and 1 unit of light gallic cavalry. Seeing how Matt had deployed a strong center I chose to deploy in a Zulu inspired bull's horn. My Axillaries took the center and screened by skirmishers, flanked on either side the Legionnaires, and finally the Praetorians. My cavalry deployed on my right, across from Matt's.
When the game started in began with a general advance of each division. My orders rolls were not great and my progress was slow. The Praetorians get a free move if you fail and order and my Axillaries were proving to be stubborn to movie. After the first couple of turns my battle line had naturally taken on the crescent or bulls head shape. Matt's battle line had been able to advance in line with the exception of his mounted division, which was refusing to move. My Praetorians clashed first with Matt's weaker flanks but they failed to collapse right away. This gave time for his strong center of Pikemen to engage my Axillaries. I was taking a gamble that my center would hold long enough for me to roll up his flanks and turn on his center. Amazingly my Axillaries held, in fact, one of them held till the end of the game. Matt's flanks did start to collapse back slowly, mostly due to the fact that phalanx infantry have a better chance of not taking a brake test when loosing combat. We messed up some rules that might have made the collapse of his flanks go faster but also the braking of one of my divisions. My cavalry broke one of his divisions and then turned to assist in rolling of the right flank.
We called the game with both armies having 1 broken division but the Romans had the tactical advantage. The game could still have gone either way but we had run out of steam (10pm). Overall a great game and I got right to work on my Dark Age armies for the rules.


1 comment:
A lovely sized battled, good to see a post covering the larger scale on a standard sized table with HC.
Post a Comment